Commission: Dark Eldar Incubi
We all have those projects that we pick up for the fun of doing them or for the challenge. This was supposed to be the former, and it turned into the latter.
I have been very complimentary of the Dark Eldar line up to this point; Jes Goodwin has done a fantastic job with the overall sculpting and the plastic kits have been wonderfully interchangeable. However, this does not extend to the metal Incubi kit.
So, without further tarry, hold on to your hats, grab your helping hands and rubber bands, the Dark Eldar Incubi are a challenge in and of themselves.
 |
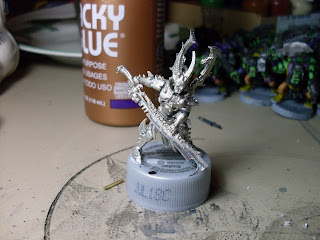
| The Bastille- in not so great shape |
I have been modeling for several years now and the once scary multi- part metal models do nothing more than garner a passing glance. However the Dark Eldar Incubi are sure to strike fear into the heart of the most experienced modeler. Oxford dictionary defines Incubi as “a cause of distress or anxiety.” This could not be truer.
First off, the Incubi have these really sweet trophy racks meant to strike fear into Imperial Guardsmen and enthusiastic hobbyists alike. They are very small, temperamental, and are aligned at an awkward angle.

As you can see, it is off by about 45°. Clearly, the designer of this kit did not have to put it together. Normally I would simply pin this type of join, however, due to the fact that it makes contact at an angle, a pin would be more difficult.
I knew none of this.
 |
| Internal knowledge of Dark Eldar Incubi |
So there we go, putting the Incubi together. I start off with the swords. This chap is an absolute breeze, I wish the others followed suit.
 |
| Mr. Easy Arms |
After I get the swords on for those first two I spent over two hours “working” on getting them together. Keyword: Working. Now this is the type of work that your dad does on Saturday morning in the garage. But he, and I, were only getting very frustrated while getting nothing done.
I attempted to run and gun while assembling these and in the process I did a superb job of gumming up delicate joins with tones of 5 minute epoxy. These joins then had to be cleaned out so I grabbed my handy dandy…
| Hobby Knife |
The hobby knife was defeated.
So I turned to my handy dandy…
 |
| Pin Vice |
The pin vice was also defeated.
Let me remind the hobby community that it is usually necessary to have the best tool for the job. Sometimes it is necessary to use the tool that will get the job done. So with much swearing and grumbling I decided that all bets were off.
I turned to my handy dandy…
 |
| Cordless Drill |
The drill was able to clean out enough epoxy to finish the build.
 |
| The product of hours of swearing and grumbling |
All in all this was a very frustrating several hours. If you have the option to have someone competent assemble this kit, take it. You know those guys at your FLGS that are always asking to borrow paint or glue? Now is the opportunity to CASH IN THOSE FAVORS!!! Save yourself the time, and as Oxford tells us, distress and anxiety.
Lessons learned
· Get familiar with your models before breaking out the glue.
· Have a plan for assembly.
· Have plenty of assistants. (rubber bands, helping hands, girlfriend, etc)
· If using any type of epoxy, make sure your assemble in stages.
· When in doubt, Power Tools.
Thanks for reading and stay tuned!
Dave

No comments:
Post a Comment